To make its own jeans is also an ethical choice! Globally, the jeans industry is not so great. Everyday, employees working in jeans factory are in contact with many chemicals (like the one used to wash the denims) which are compromising their health and the environment. Ethically made jeans can be very expensive and hard to find so making your own jeans equals perfect solution!
We hope you like this new tutorial to help you organize your DIY jeans project. We even have this cool template that you can use here.


Pictures by Anya Tsinko (www.anna-zoe.net) wearing her handmade skinny high waist jeans (TR803).
The materials
Denim is made of cotton yarn in a TWILL weave (pictured above), which gives its familiar fine diagonal stripes. It will mostly be woven and then dyed. This is why it will be crucial to pre-wash your denim. Not only this will shrink your fabric but it will also remove the excess of dye on the fabric. Washing denim with vinegar will also help to set the dye better into the fabric.

Stretch denims are woven in the same manner along with SPANDEX fibres to make it stretchy, Spandex is an artificial fibre that is transparent and very elastic.
Denim weight is measured in ounces. A light weight denim will be around 5-6oz. The higher the number, the thicker it will be. A medium weight denim is about 7-9oz. Denims above 10oz might be more difficult to sew with a conventional sewing machine.
Poplins are also needed for your pocket bags. Choose a natural fibre to match with your denim but keep it thin to avoid bulk


Hammers can be helpful if you need to flatten bulky seams.

Zippers must have sturdy metal teeth. Match its metal colour with any other metal present on the garment such as rivets or jeans buttons.
Jeans buttons are very easy to install and they come in two parts. One is the actual button and the other is a screw. Pierce through the fabric where you wan the button to be, insert the screw through the hole from the inside of the garment and screw the button.
Rivets are small disc that can be placed on each side of pockets opening to make them more resistant. If you do not have rivets, bar-tacks (short zigzag stitches) will do the same job. There will be more info for these in the sewing section.
The fit
First, choose the right inseam length, or the distance between the crotch and the bottom of the leg, according to your height and adjust your pattern accordingly.
5ft3 (160cm) and below = 27" (68.5cm) inseam
5ft4-5 (164-168cm) = 28 to 29" (71-74cm) inseam
5ft5-7 (168-173cm) = 30 to 31" (76.5-79cm) inseam
5ft8 (176cm) and above = 32-33" (81.5-84cm) inseam

Do not waste your denim fabric by making a muslin first. A muslin in a test fit sample made in a cheaper fabric. The fabric must be similar in thickness and if you are making stretch jeans, the fabric for the muslin must stretch as well. It does not require any sort of seam finish or trims so you can stitch it very quickly and try it on to detect any fit issues. Unpick where you feel tension and pin any excess of fabric!
Below are 6 common fit issues and how to fix them.

Sewing tips
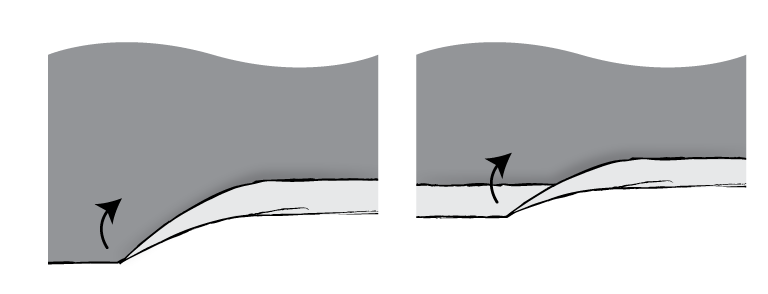
Denim fabrics tend to fray a lot. We recommend flat-felled seams and double turned hem to make your garment look very clean on the inside as they will not leave any visible raw edges.
To make a flat-felled seam, you will need a seam allowance of 15mm (5/8"). Then, assemble the matching seams WRONG SIDES TOGETHER. Press the seam open and trim one side of the seam allowance only down to about 3mm (1/8"). Fold the remaining seam allowance in half to align the raw edge with the stitches. Fold and press the folded seam allowance over the trimmed one. Finally, make the topstitching along the folded edge to stitch it down to the garment.

Flat-felled seams are more difficult to achieve in curved areas.
Otherwise, edge-finish your pieces before assembling and press the seams open to remove any bulk. To edge-finish, use an overlocker or serger machine OR stitch on the very edge of the fabric with a zigzag stitch.
Double turned hem is pretty self-explanatory, just turn the edge twice toward the inside! You might find it easier to fold it once, then press and fold again. Pin the hem, stitch down and press.
One of the main feature on a pair of jeans are topstitches. To make neat topstitches, there is a type of presser foot that you must have. Its guide bar keep the fabric edge from moving and your topstitches are perfectly parallel to the seam!

Heavy duty thread (size TEX 60) is not necessary but its thickness will make the stitches bolder and sturdier. If using the heavy duty thread, do not wind the lower bobbin with it, just use a regular matching thread. You will also need the appropriate jeans or topstitch needle in order to thread with the heavy duty thread.
Topstitching requires a slightly longer stitch length than usual. Do not get shy when increasing your sewing machine tension above the usual 4-5. It's normal, the thicker the fabric, the higher the tension must be. It's always best to do a test on a scrap of fabric folded several time to match with the seam thickness you are dealing with. Working with higher tension means that you will need to hold the top thread trail when starting a new seam otherwise it will unthread from the needle.
Bar-tacks are short stitches of about 10mm (3/8") made using a very tight and narrow zigzag. They are placed in areas subjected to a higher tension or to secure a stitch.


Some sewing machines will have no trouble to sew over a bulky seam, but if yours doesn't, the trick is to lift your presser foot enough so it's on the same level as the bulk. To do that, there are already several gadget already available on the market, which are sometimes called "hump jumpers". You can also make one yourself by folding a think fabric several time to make it about 3-6mm (1/8-1/4") thick. Once you reach the bulky seam, needle down, lift your presser foot and place the object behind the needle. Drop the presser foot and make a few stitches. You might need to lift and replace the object another time to stitch completely over the bulk. Remove the object to resume stitching.

Sewing the jeans fly is more challenging so try to sew it separately several times before sewing the whole jeans. You'll be more confident when it will be time to make it for real.
The final touch
Tea and sand paper can be used to make your jeans look more authentic, like the ones in stores. Sand paper is used to rub against the garment, especially around the seams, to make them look worn-out and distressed. Some prefer to stitch the garment first, sand it and then finish the topstitching. Washing your jeans with some tea will also change slightly the colour to give it a vintage look.

What is your favourite tip for sewing jeans? Let us know in the comment section!
No comments:
Post a Comment